25 Jun BackupAssist “data containers” and how to use them
 The ‘System Protection’ job in BackupAssist is the most widely used by the customers I come across. It’s fast, efficient and it creates a full image backup of your server ready for disaster recovery.
Despite its popularity, there were some limitations if you wanted to use anything other than a USB drive as your destination.
Enter the ‘data container’.
A little background
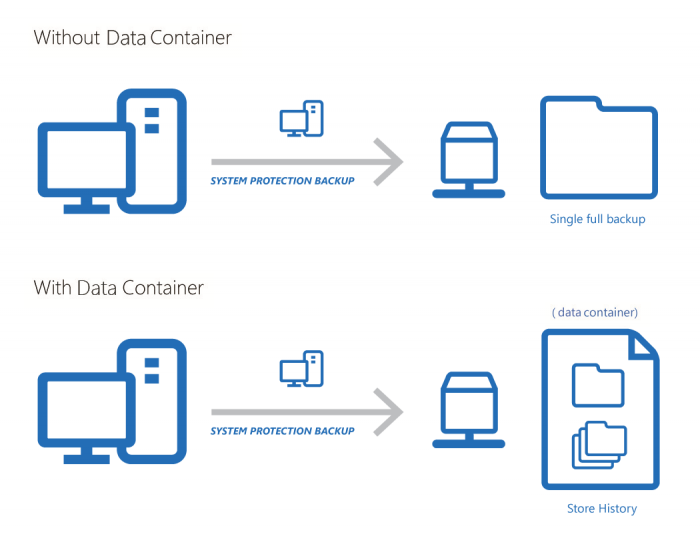
Prior to the release of data containers, if you wanted to have an image backup history, created by doing a full backup and then subsequent differential updates, you’d have needed to choose a USB drive.
If you were using either a network share or even an RDX drive, you could only keep one backup, overwriting it every time. OK, but it would be slower because you’re backing up the whole server each time and you’d only have one restore point to work with.
Introducing data containers
Data containers are storage files the backup job creates on the destination media, that hold backups. The beauty of this approach is that a container can be automatically mounted as a local disk for backups and restores. This means your Windows Server will not see a strange or unexpected media, but a media that it understands and can work with.

Now, when you create an image backup to a network destination or RDX drive, using a container you’ll be able to benefit from both differential updates and multiple restore points.
This means your backup jobs run faster, storage requirements will be lower and you’ll always have a historical view of your data.
How to create a data container job
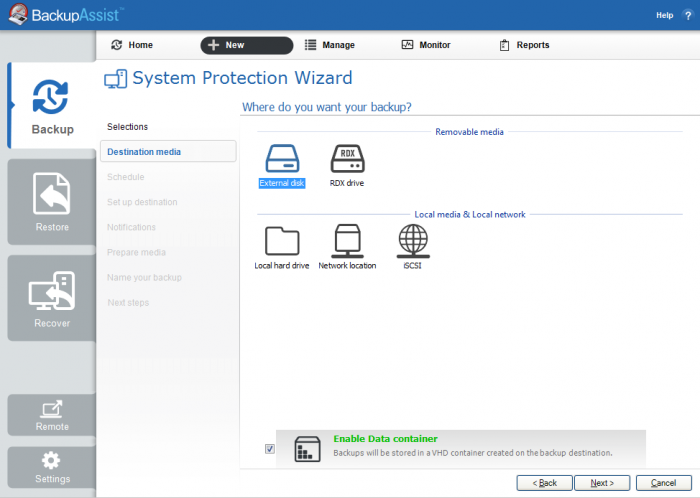
To get up and running, simply head over to the destination media section within the BackupAssist interface, and look for the check box option as shown below.
Next, specify where you’d like the data container to go and how big you want it to be:-
- Enter the path into the field provided. The data container will be automatically created at that location the first time the backup job runs.
- Set the size of the data container using the Container size up and down arrows (we recommend a size approximately 2.5 times the size of the data being backed up).
By default, RDX and External disk destinations will have Use all available space selected.
BackupAssist will automatically mount the data container each time the backup job runs and put the backups inside it.

Need to perform a bare-metal restore?
No problem!
During the backup selection step, RecoverAssist has a button called Search for Backup in a Container. Click the button, browse to the location of the data container and RecoverAssist will mount it for you. Nothing else changes.
That’s it! I hope you found this article useful – please feel free to let us know how you’re getting on via the comments field and for support with configuration you’re always welcome to get in touch via phone or email.


