12 Jun Testing Bitlocker with BackupAssist as an alternative to TrueCrypt encryption
 You’ve probably picked up in the IT press that the developers of TrueCrypt, currently integrated within BackupAssist, are no longer actively developing the software.
A recent independent audit published by iSEC has not identified any security flaws in TrueCrypt, however at some point in the future, it’s likely vulnerabilities may creep into it.
DISCLAIMER: We’re not suggesting you need to switch away immediately and ultimately fully expect to see a new encryption application integrated into BackupAssist.
However….I like to tinker…
Bitlocker Drive Encryption (BDE)
Bitlocker Drive Encryption is a full disk encryption feature included with the Ultimate and Enterprise editions of Microsoft’s Windows Vista and Windows 7, and with the Pro and Enterprise editions of Windows 8 desktop operating systems, as well as the server platforms, Windows Server 2008, Windows Server 2008 R2 and Windows Server 2012 and Server-core
Let’s start with the bad…
The major limitation I came across using Bitlocker through the Windows GUI – is that I don’t see it as practical for most administrators because it requires you’re permanently logged in order for it to manage the locking and unlocking of your drives.
Using the command line to get around this…
In my tests I was looking for a way to automatically unlock the encrypted drive each time the job runs, and then re-lock it once the job has completed.
With a little help of the Bitlocker command manage-bde and BackupAssist pre and post job scripting, it seems this can be achieved…
Please note the following current limitations of this method…
(This testing is very much work in progress and may change over time)
- Tested with File Protection jobs
- Tested with System Protection job using Data Container option
- Only tested with USB hard drive destination formatted as NTFS
- Only tested with single destination (not rotating disks yet*)
In this example I will walk through the process to set up a BackupAssist File Protection job to a single USB Hard drive encrypted using BitLocker.
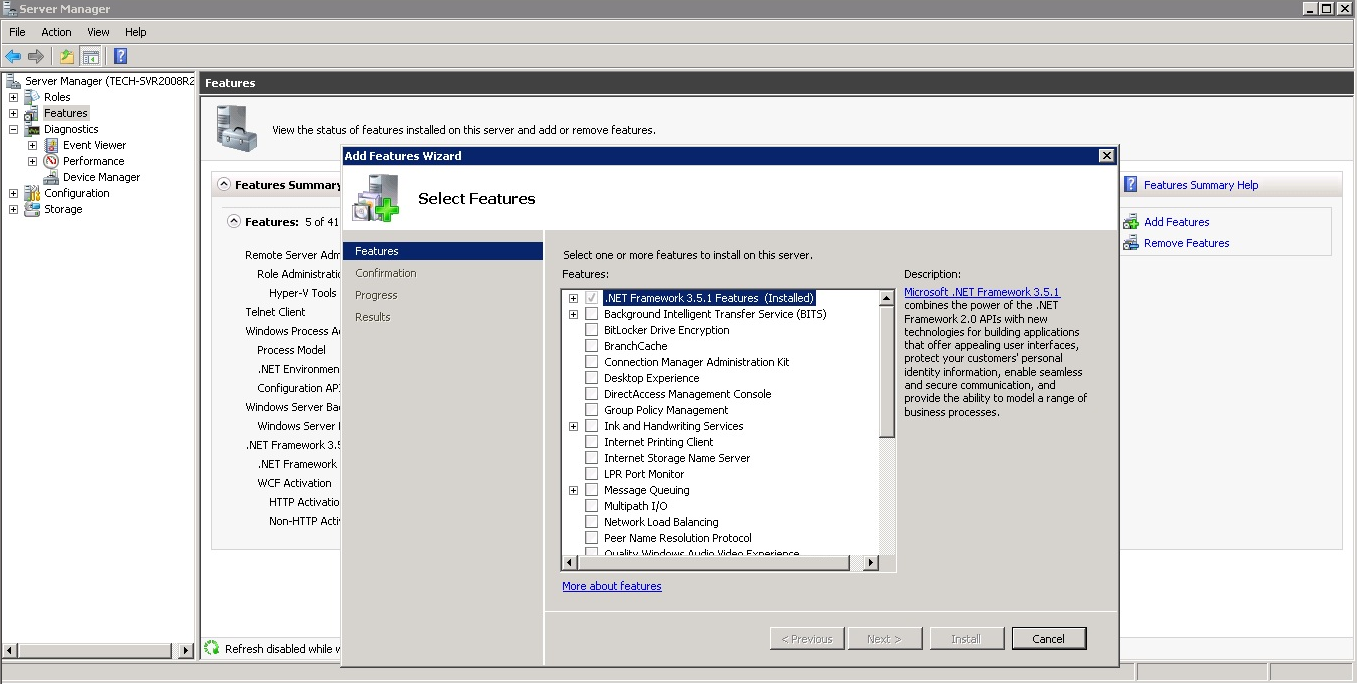
Step 1 Installing Bitlocker
Before we can use BitLocker it needs to be installed within Windows.
- Open Server Manager.
- Select the Add features option from the Features Summary Help menu.
- Tick BitLocker Drive Encryption and select Install.
 BitLocker is pre-installed on Windows 7 and 8/8.1(Enterprise edition only) and accessed using the Control Panel\System and Security.
Step 2 Encrypt the destination disk
Before you encrypt the destination USB drive make sure it is freshly formatted as NTFS.
For destination drives to work with Bitlocker, they must be first encrypted. I recommend using the command line tools because (bizarrely) using the usual windows GUI method does not appear to then make it possible to unlock using the command line tool.
Lets Begin…
The first thing to do is to create a folder on the root of your C: drive to store the Bitlocker encryption keys that will be created when encrypting a new drive. I will call this folder C:\bitlocker-keys
Next, open a command prompt and type the following command:
manage-bde -on H: -RecoveryPassword -RecoveryKey C:\bitlocker-keys\“H:” is the drive letter of the destination drive “C:\bitlocker-keys\” is the folder where you want to store a copy of the encryption KEY.
The encryption keys you create are important and you will ned them to encrypt and decrypt the encrypted hard drive so keep a copy safe and secure.
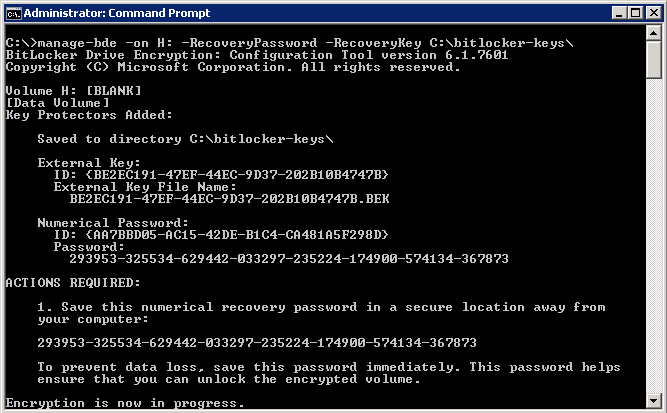
When you run this command, the destination drive will be encrypted and you will find a new encryption key stored under the C:\bitlocker-keys\ folder. This will have a file name something like…
BE2EC191-47EF-44EC-9D37-202B10B4747B.BEK
To make this easier to identify in the future, I recommend renaming this file to the media label of the destination drive. i.e “Daily 1.BEK“. Please note the contents of the file must remain exactly the same!
As we also used the’ -RecoveryPassword’ option on the command there is a numerical password shown in the command window that alternatively be used to unlock the drive…
293953-325534-629442-033297-235224-174900-574134-367873
We’re not going to use this password as it will be shown later in plain text and isn’t secure but you may want to take a copy of this key and store it in a safe place as you can use it to easily unlock a drive with any server running Bitlocker without requiring the key file.
Step 3 Manually Mounting the Bitlocker encrypted drive
In order to use the drive within BackupAssist and prepare it we must first mount the encrypted drive manually at the command prompt (one time only). To do this at the command prompt type the following…
manage-bde -unlock -recoverykey “C:\Daily 1.BEK” H:This will unlock the drive using the encryption key we created and renamed before. In this example our encrypted drive is Drive H: You should now notice an unlocked drive show up under Windows Explorer and is ready to use like a normal drive would be…
Step 4 Configuring the BackupAssist Job
We now should have a working H: that we could back up to but we need to configure BackupAssist to prepare this drive as well as add some custom scripts to mount and dismount the encrypted volume automatically when the job runs.
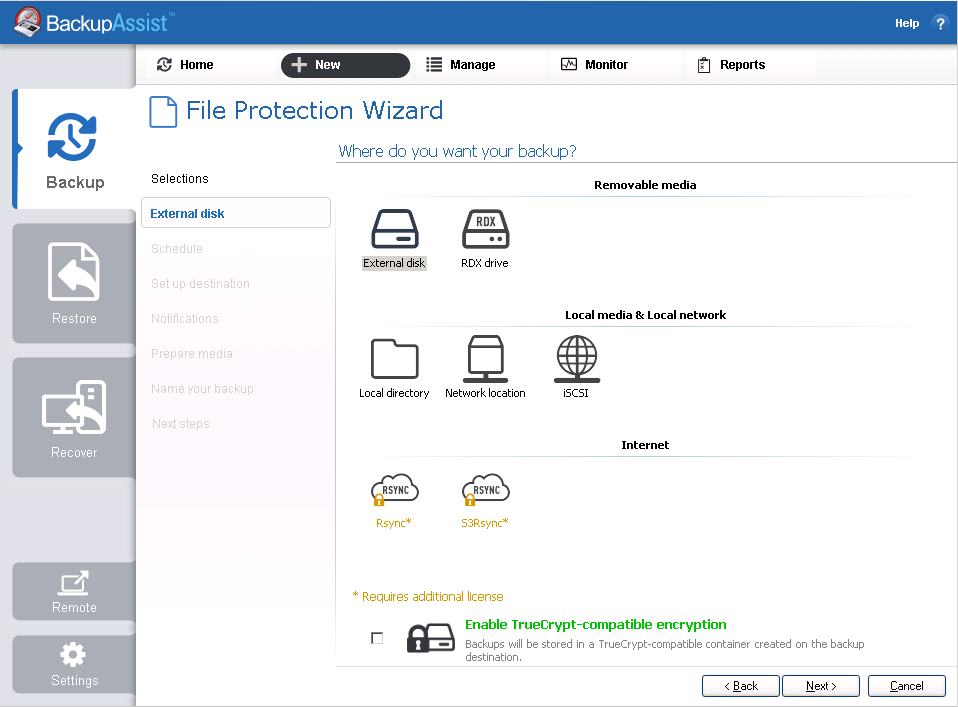
1.Create a new File Protection job and run through the setup wizard as normal, when you get to the destination section select to use an External disk as the destination…
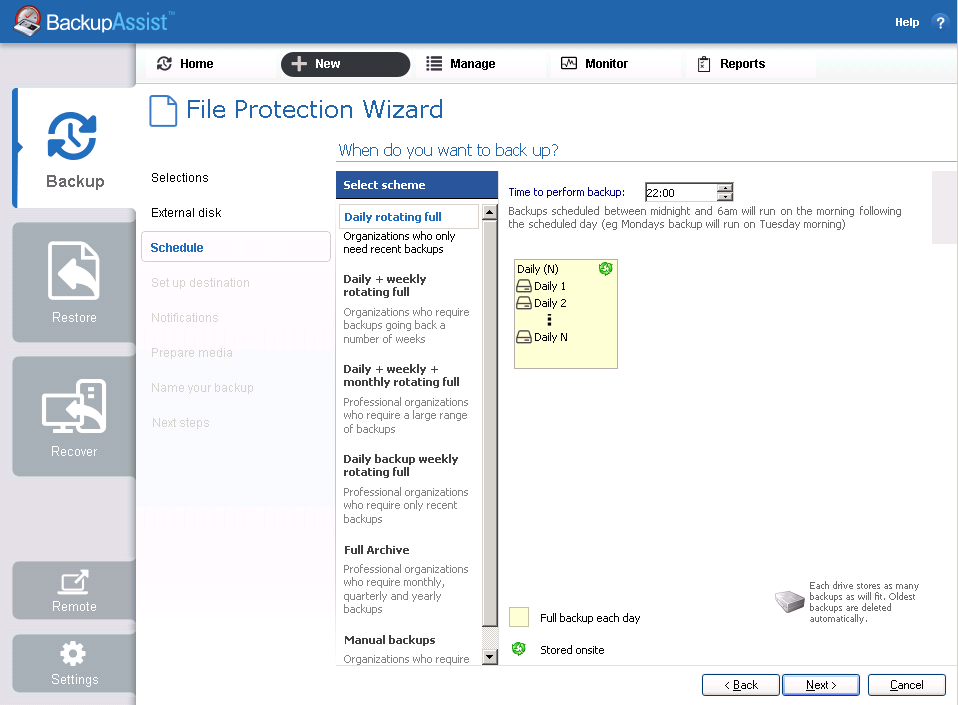
2. Choose the rotation scheme as usual (I will stick with Daily rotating full)
3.You should be able to enter the drive letter or detect the drive for our unlocked drive (in our example Drive H:)
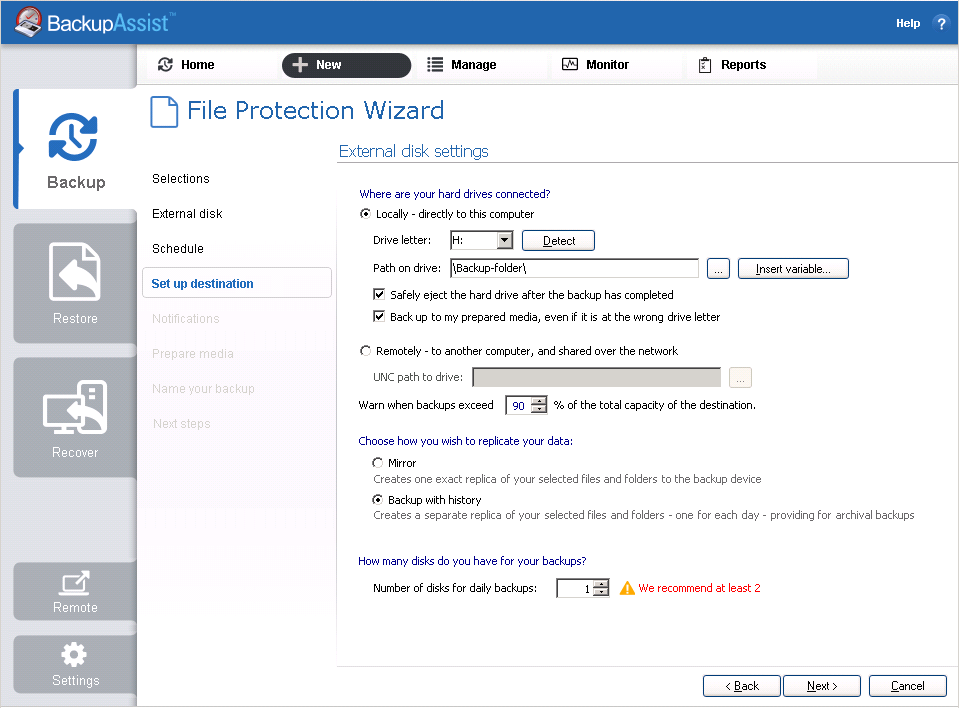
4.Be sure to change the number of disks for daily backups to 1 (in this example we are only using one USB disk)
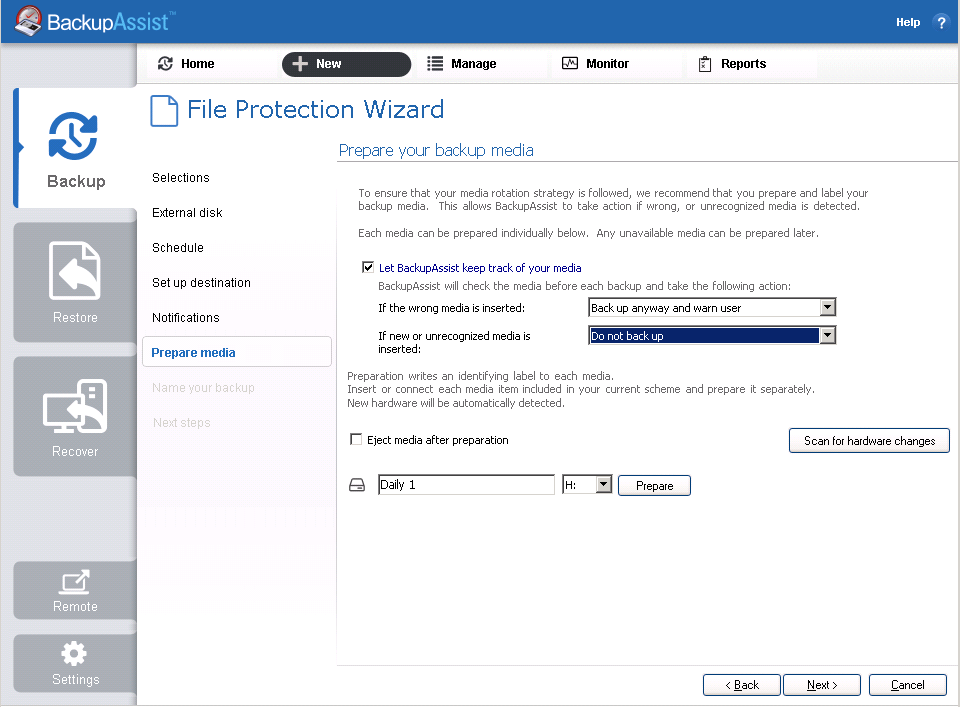
5.Under the ‘Prepare media’ section be sure to prepare the “Daily 1” disk.
6.Continue to the end of the job and Save.
7.Next edit this newly created job and open the scripts section.
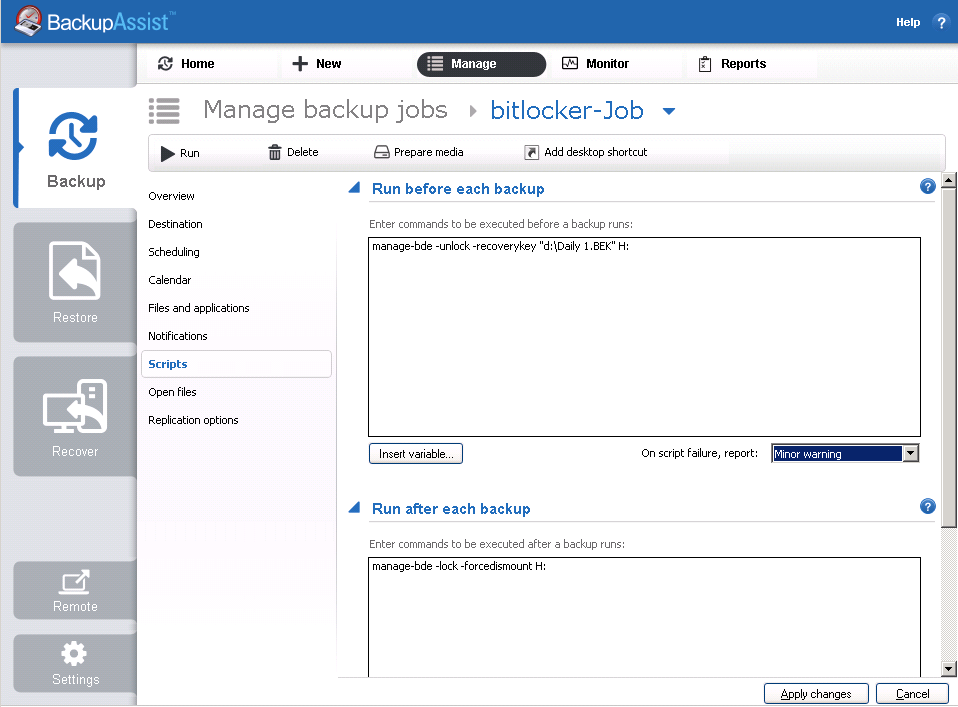
This is where we need to enter the scripts that unlock and lock the encrypted hard drive before and after the job. Under the “Run before each backup” section enter the script…
manage-bde -unlock -recoverykey “C:\bitlocker-keys\Daily 1.BEK” H:Under the “Run after each backup” section enter the script…
manage-bde -lock -forcedismount H:Choose ‘Apply changes‘
8. Now before we test this job we need to manually lock the encrypted drive (remember we unlocked it early on).
We can do this using the script we have just entered by entering it at the command prompt…
manage-bde -lock -forcedismount H:Step 5 Test the job.
Within BackupAssist run the job and keep an eye on the Windows Explorer window. You should be able to see that before the jobs starts the encrypted drive is shown with a yellow Locked padlock..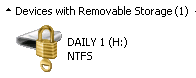 ..and when the job runs this should change to a grey unlocked padlock during the backup…
..finally returning to a yellow locked padlock after the job has completed.
..and when the job runs this should change to a grey unlocked padlock during the backup…
..finally returning to a yellow locked padlock after the job has completed.
*Advanced method using multiple destination drives
I have tried to keep this guide as simple as possible, so kept to using a single destination drive scenario. However as I appreciate it’s common to backup to a pool of disks on rotation, I’ve covered this separately below.
When using multiple destination backup disks, each will need to be locked using the method above and all will have a unique key file created. This is very important as you can only unlock the disk with the key that was generated when you first encrypted it.
This is one of the the main reasons I rename to something more understandable at the first step!
So the process is to go through one disk at a time and rename the key to match the disk you are working on.
Lets say you have 5 disks (Daily 1, Daily 2, Daily 3, Daily 4, Daily 5) you should then have 5 ‘.BEK’ files labelled Daily 1.Bek , Daily 2.BEK etc. under the C:\bitlocker-keys\ folder.
The next step is to manually unlock and prepare each disk as described above.
Finally we change the unlock script so that instead of pointing to a specific .BEK file we use the variable ‘%MEDIA_LABEL%’ to point to the relevant key for the destination drive that is connected…
So the ‘Run before backup’ script would become…
manage-bde -unlock -recoverykey “C:\bitlocker-keys\%MEDIA_LABEL%.BEK” H:The plan is to fully integrate Bitlocker integration into future releases of BackupAssist so in the future this process should be significantly easier, but if you are looking for a way to integrate Bitlocker right away, I have had good success using this method. However I should point out this is still work in progress so you should fully test this method before you use it for live system backups.
If you do try this out please let me know how you get on in the comments below