06 Jul Continuous off-site backup of our hosted SQL database using BackupAssist
 As part of ongoing improvements to our own network, I recently revised the way we approach backing up the SQL database that underpins our main company Web site. We currently host the web and SQL server in a local data centre and were taking off-site daily backups using a combination of BackupAssist and the Rsync add-on. This was adequate for restoring a snapshot of the website or database to the previous day, but I wanted to improve the frequency of our backups given how often the database is changing as we take orders throughout the day. Luckily BackupAssist was there to help!
Step 1 Create an SQL backup job
First off, I set up a new SQL transactional job on BackupAssist to run every 15 minutes between 6am and 12pm (as we very rarely take orders outside of these hours).
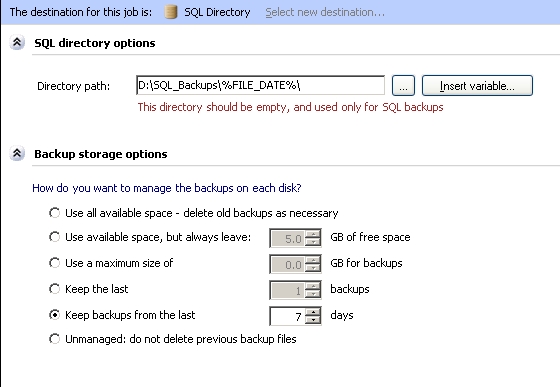
This job backs up all the SQL databases and stores then to a local hard drive using dated sub folders per day. To automatically create the dated folders I used a destination of “D:\SQL_Backups\%FILE_DATE%\”, this macro creates a new destination folder every day.

I chose to only keep backups for the last 7 days as we really only need a local archive for the last week, we have a long term archive back in the office that goes back many weeks and includes a copy of this backup
I tested this job for a few days to check it created the folders as I expected. Typically the job took 30 seconds to run through full backup of around 500MB and 10 seconds to create the transactional log backups.
I let this run for a the rest of the week then looked at how I could send these backups offsite using Rsync.
Step 2 Create an “RSYNC” job
I already had a Rsync job configured within BackupAssist to take a ‘Mirror’ of the ‘D:\SQL_Backups\’ folder and store it on the Rsync server located in the office. By default this job was scheduled to run once a day at 11pm.
This worked well but we were still only getting an offsite backup once a day which was not ideal, so the final stage was to get the SQL job to trigger the Rsync job every time it ran every 15 minutes).
Step 3 Editing the SQL job
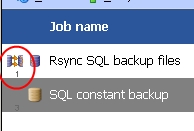
Before we could trigger the Rsync job we needed to know what job “ID” it had been assigned. Fortunately this is easy in BackupAssist , and all I needed to do was press <CTRL – D> in the jobs window and I was presented with all of the job ID numbers.
 If you look at the screenshot to the right, you can see that my Rsync job is ID ‘1’.
Next I edited the SQL job and under the scripts section where it says ‘Run after each successful backup’, we added the following script…

For the purpose of copying and pasting the script is
This starts the BackupAssist job with ID ‘1’ (our Rysnc Job) every time the SQL job runs successfully.
Now every 15 minutes the SQL job runs updates the transactional jobs and stores them on the D drive. As soon as it’s done this, the Rsync job runs and copies the new files over to the Rsync server. Both jobs now run and complete in about 50 seconds.
If we ever need to revert to a previous version of the SQL database, we can do this quickly on the SQL server itself and choose any point in time for the previous 7 days.
In the worst case scenario, if we lose the SQL server altogether we have a very up to date backup on a remote server that we can use to restore the database from.
Hopefully you’ll find it relatively easy to replicate what I’ve done here but don’t hesitate to give any one of us a shout if you need any help setting a similar set of jobs on your own hosted SQL server.

