18 Jan BackupAssist’s rsync ‘seed’ function explained

If you’ve ever used BackupAssist to run an rsync job to a remote NAS device, you may be familiar with the built in ‘seed’ function. This bypasses the need to run a large backup for the first time over the network and instead uses a USB hard drive to move the data manually. After the seed job has completed, the drive is disconnected from the BackupAssist server and plugged directly into whatever is performing the role of the rsync server. Often it’s a NAS device, but I also talk to customers who choose to run either a Linux server which has native rsync support or even a Windows box using the free open source CWRsync service.
By using the seed function, on a standard office Internet connection, administrators can see the first backup taking just a few hours rather than what could potentially have been a few days. The benefit here being it frees up the network for day to day use.
What does the seed function actually do?
When you run a seed job in BackupAssist, two tasks are performed. The first one takes a copy of the data to be backed up as a standard Windows file copy (preserving files and folders and the drive letter of the source). The second creates what’s known as a “bash script” file that can be used at the destination to move this copy of the data to the correct location.
Although it may not appear it at first glance, there’s actually more going on here than simply creating a copy of the data – so now we’ll take a closer look…
So what’s actually happening?
Once the seed job has finished in BackupAssist you’ll see a file’s been created called ‘seed.sh’ in the root folder of your destination device. This is the bash script and is designed to be run on the destination Rsync server that your backup is configured to connect to.
Below is a sample bash script in its entirety:-
#!/bin/bash
set -x
src=”`echo $0 | sed ‘s![^/]*$!!’`”
if [ -z “$src” ] ; then
src=”./”
fi
dest=”/server-a”mkdir -p “$dest”
rsync -av “$src” “$dest”
At first glance it may not make much sense if you’re not a Linux user, however it’s basically just executing the simple rsync command we see in isolation below.
rsync -av “$src” “$dest”
Everything above that point in the code is there to configure the two variables for the source folder ‘$src’ (the current working directory the bash script is run from) and the destination folder ‘$dest’ (defined explicitly from the location given when setting up the rsync job in BackupAssist)..
What this shows is the ‘rsync’ command comparing two folders – the source (USB hard drive) and the destination folder where the backup should end up on the NAS. As the destination is blank, all files and folders are copied.
In addition to copying the files themselves by using the rsync command, file deltas are created for each, which are used by BackupAssist when the job runs again. It’s these deltas that are used to compare files being backed up and to work out which blocks of those files have changed. Only the changed blocks are sent over the network and used by the rsync server to re-construct the file, consequently far less bandwidth is used, making it ideal for those sites with low speed Internet connections.
How do I run the script?
To run the script you must be able to either log into your NAS using SSH (usually as the root user), or if you’re using a Windows server you can use the excellent Putty tool to do this (see my “software tool of the week post” for info on this).
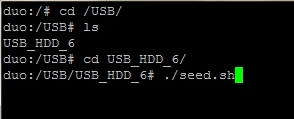
Once you reach the Linux shell, you’ll need to navigate to the mount point for the USB drive. The exact path for this differs with every NAS device so you may need to do some Googling if you struggle to find it.
In my example I’m using a Netgear ReadyNAS and the USB drive path is ‘/USB/USB_HDD_6/’ but this may be different for your drive.

Once you’ve navigated to the root of the USB drive, simply run that script file with the command ‘./bash.sh‘ and watch your files start copying. Time to make a cuppa…

