08 Jan How MailStore can help with your on-premise to hosted Exchange migration
Planning a move from on-premise Exchange?
MailStore is a fantastic email archiving product, and one of the main things that makes it so good is its ability to be able to archive almost any email platform including Microsoft Office 365.
So if you have recently moved your email from a local on-premise exchange server over to Office 365 and are wondering how to deal with the reconfiguring the MailStore archive, don’t worry In this article I will walk you through the changes that need to be made to continue using your existing MailStore Server without losing any of your current archives
To begin with, let’s have a quick look at the different components of a MailStore configuration and how they differ between archiving an on-premise Exchange server solution and office 365 accounts.
User synchronisation
MailStore requires user accounts to be created in order for your users to log into MailStore and access their own archives and archive jobs also reference the user accounts when archiving multiple mailboxes. You can create users manually within MailStore but more often they are synchronised automatically against a local directory store. Synchronising users automatically simplifies the process of creating the users ( especially if there are large numbers) but also the synchronisation method queries the user’s password details live against the directory service. so If a user password has changed it is automatically changed in MailStore.
If you have been using an on-premise Exchange server you would typically be synchronising your users against a local Active Directory.
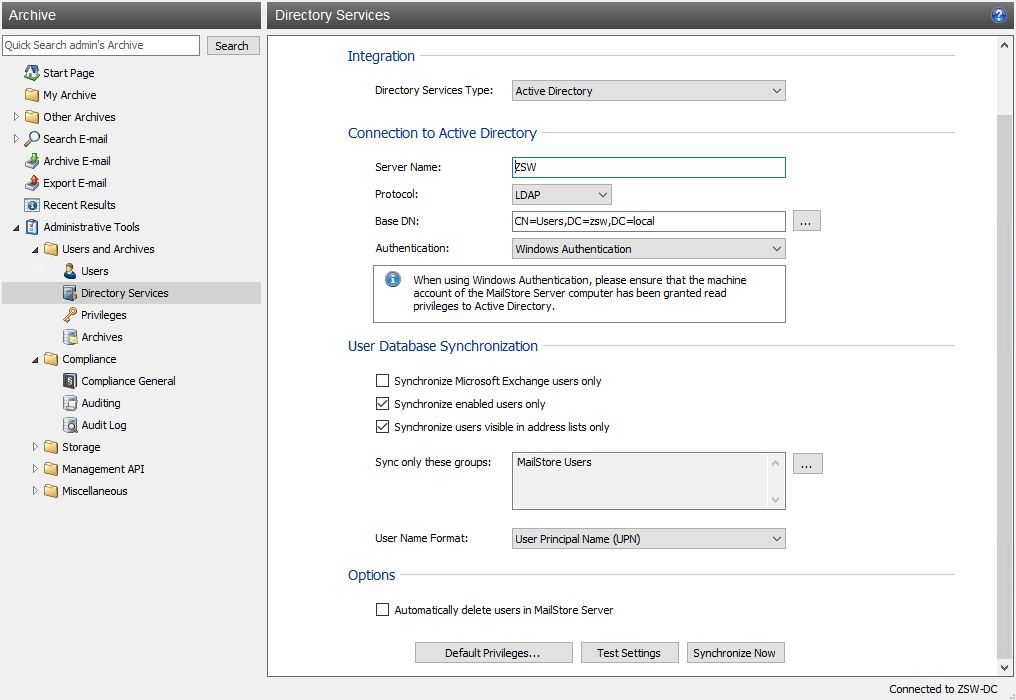
It’s worth noting that the user format is set using the ‘User Name Format’ setting, so in this example using (UPN) the users are in the form ‘name@windows_domain’
It’s not uncommon for the local AD to still be present if you migrate users over to Office 365, however, when archiving Office 365 mailboxes it’s recommended to synchronise the users directly with Office 365 Azure Active Directory using the specific Office 365 directory services Type.
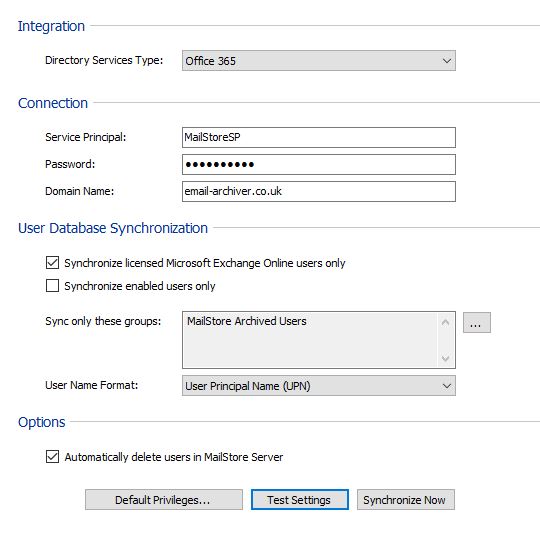
Note we have set the User Name Format as ‘UPN’ This will import users using the full email address format.
In order to use the Office 365 DIrectory Services method, you will need valid credentials to query the Azure AD that Office 365 ties into, these additional steps are covered in the Microsoft Office 365 MailStore configuration guide.
Synchronizing User Accounts with Office 365
Once you are ready to synchronise users directly with Office 365 we recommend you should choose the option to ‘delete all removed users’. This will replace all the existing user accounts that have been synchronised previously with those that only exist in Office 365.
Don’t worry the user’s archives will remain this only removes the user accounts!
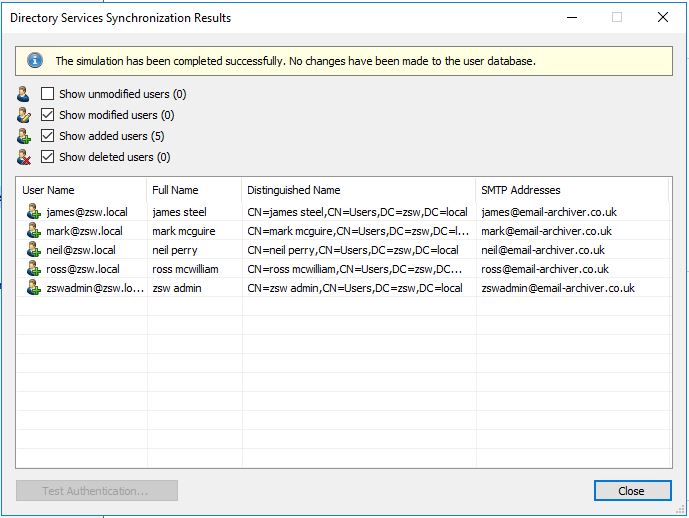
If you run a test synchronisation you can see how the account details will be changed before running a final synchronisation
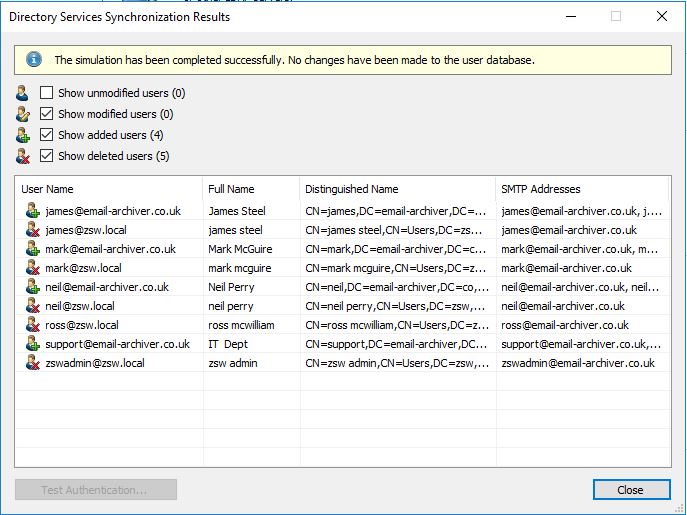
You can see how this process will remove the old AD accounts (the accounts with the red ‘x’) and add the new Office 365 Synchronised accounts (the ones with the green ‘tick’).
Once you are happy that the process will amend users as required you can run a ‘Synchronise now’ to update them within MailStore.
We recommend using ‘User Principal Name (UPN) with Office 365 Synchronisation so users would log in with their full email address like they do with office 365 authentication. This, however, will likely result in duplication of users archive store folders ( old format + new format), we will look at how you can tidy this up later in the ‘Renaming users archives if required’ section below
Archive Jobs
Archiving Office 365 Mailboxes
MailStore archives email through the configuration of one or more Archive jobs. If you have been previously using MailStore to archive an on-premise Exchange server you would typically have a mixture of mailbox jobs and journaling jobs configured. By moving over to Office 365 none of your existing jobs will be needed and you can safely remove them all and create fresh jobs following the best practice guide.
Archiving Multiple Office 365 MailBoxes in a single job
Archiving Office 365 mailboxes is relatively straightforward but before you can create MailStore multiple mailbox jobs’ you will need to make sure one of your Office 365 User accounts have the correct rights to access the contents of other users mailbox data. This is known as ‘Application Impersonation’.
Configuring application impersonation rights within the Office 365 Exchange Administration console and configuring a ‘Multiple mailbox job’ is covered in the following MailStore guide
Once you have configured this job We would recommend you run through it manually at least twice to get a feel for how long the job takes to run once it has archived each users mailbox at least once and is only updating new email it finds. You can then right-click on the job and configure it to run Automatically, typically we recommend running this job every 3600 seconds (1 hour). to keep the load on the network to a reasonable level. There is typically no need to run this job any more frequently than this.
Journaling (optional)
One of the big differences with an Office 365 setup vs an on-premise Exchange server is the options available for Journaling email.
Journaling is a technique used when archiving email as a way to guarantee all messages get archived even if users delete them from their mailboxes as soon as they receive them. With an On-premise Exchange setup, this is a simple case of adding a Journal MAilbox and storing a copy of all ‘Journaled’ email in it. MailStore can then be configured to collect this mailbox and sort the messages its finds into each users archive folder.
However in an Office 365 deployment, due to restrictions, Microsoft has added into Office 365 they do not allow customers to use any Office 365 mailbox to store journaled email. Instead, you must deliver Journaled email to an external 3rd party mailbox address outside of office 365. This does add complication to the process and typically the only way to achieve this reliably is to host a small mail server of your own in a location that you control. I often get asked why we recommend this over say just a standard mailbox, for example, Google or and IMAP mail service provider and where this would be possible to use, the main issue is that you must guarantee that all email delivered to the Journal MailBox address arrives meaning no spam filtering can be applied. This is unusual with almost all hosted mailbox services that usually do some form of spam filtering.
We would also recommend that the Journal mailbox address used is a complex one, for example, Journalajdgh98265489fgskjy736@domain.com. would be suitable. We recommend this as a way to also help stop spammers discovering or guessing the email address and sending spam directly to it, which would also get archived when MAilStore collected the email from the mailbox.
This Guide explains the process to configure a Journal rule within Office 365 and configure a MailStore job.
As a result of this added complexity, some customers decide that they will not use Journaling with Office 365 and stick to simple mailbox archiving, This is technically NOT a compliant archive but often the low risk of some messages being missed by the archive is minimal vs the added work.
Renaming users archives if required
Once the new archive jobs are all running, depending on whether your user accounts have changed you may now see who archives for each user. The original archive that was created when archiving from the local exchange mailbox and a newly named archive (full email address) for the new Office 365 mailbox.
To tidy this up you can right-click on the user’s old archive and rename it to exactly match the name of the new archive. This will merge them into the new location and continue to archive there for new email.
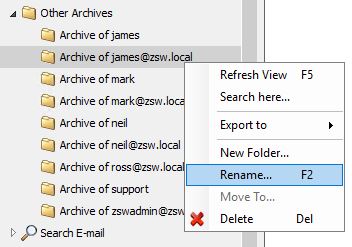
This is a manual process and can take several minutes to rename each archive, but for a smaller number of users, it’s a relatively easy task. If you have a large number of users to merge in this way, drop us a line in support as there is a scriptable method to help here, but it’s not something we will cover in this guide.