06 Sep BackupAssist and Wasabi Cloud Storage for MSP’s
BackupAssist’s ‘backup to cloud’ features support a number of cloud based locations. This backup type gives you the option to perform file and application level backups to the cloud, by configuring a compatible backup container with your chosen cloud storage provider:
Amazon S3 and Microsoft Azure provide cloud storage that is compatible with the cloud backup add-on, but the configuration and pricing structures of these providers can be complicated and difficult to understand.
Our recommended cloud provider is Wasabi. They are a cloud storage provider that simplifies configuration and pricing and provides a great alternative to the larger providers, the key advantages being:
- It’s much easier to set-up and use, with a 30-Day free trial period
- It’s up to 80% cheaper than AWS S3
- It uses a really simple pricing model at $6.99/TB/month
- Significant discounts for term and volume commitments are available
- There are no additional data transfer charges (for example, you won’t be charged to egress data – restore backups)
- Easy to manage ‘per customer’ storage buckets
By enabling Wasabi Cloud backups for your BackupAssist customers, you can therefore improve their backup resilience, reduce manual work and add an additional billable service to your portfolio.
Can a MSP use one Wasabi account for multiple customers?
Yes. The below steps explain how a MSP will be storing ‘buckets’ of data for each of their customers’ backup jobs (one bucket per job) in the MSP’s own Wasabi Cloud Storage account. By using a single Wasabi account the MSP can share the space across multiple customers buckets and minimise storage costs.
Configuring Wasabi Cloud Storage
Step 1 Create your own Wasabi account (making sure to enable 2FA!) and then login.
Step 2 Create an access policy for your customer
Do this by selecting the Policies section and clicking the Create Policy button.
Give the policy a name which will help you identify it as being for this customer eg. bloggs-company and copy and paste the following policy:-
{
  "Version": "2012-10-17",
  "Statement": [
    {
      "Effect": "Allow",
      "Action": "s3:List*",
      "Resource": "*"
    },
    {
      "Effect": "Allow",
      "Action": "s3:*",
      "Resource": "arn:aws:s3:::bloggs-company*"
    }
  ]
}
Note: In the policy above, you’ll need to edit the text displayed in red for each customer.
This policy, once assigned to the user you’ll create in the next step, will allow the user to list all ‘storage buckets’ in your Wasabi storage account but will only allow them to create and access buckets if the name of the bucket begins with bloggs-company, but must contain additional text, for example, valid bucket names would be…
bloggs-company-server01 or bloggs-company-fredOC
Step 3 Create a user for this customer
Select the Users & Groups section and click the Users button then Create User account
This will generate a unique Access Key for the customer to use along with assigning the new policy you’ve just created.
When creating the user, give them a username that makes it easy for you to recognise which customer the user represents eg.
‘bloggs-company’
Note: You’ll only be giving this user programmatic access:-
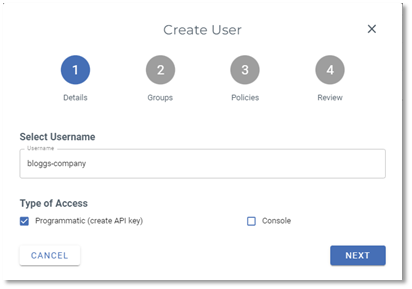
Click NEXT, and then NEXT on the Groups section.
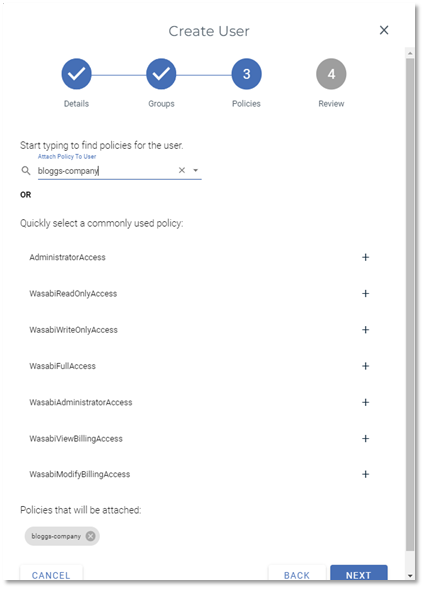
On the Policies section, attach your newly created policy to the user and then click NEXT:-
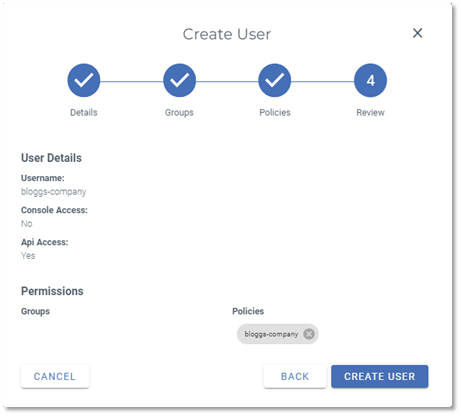
Finally, complete the creation of the user by clicking CREATE USER:-
Once you’ve created the user, the access key for the user will be displayed:-
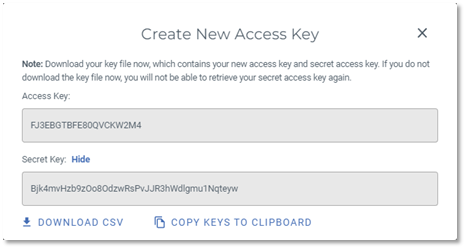
When setting up a job in BackupAssist, you’re going to need both the Access Key and the Secret Key (click Show to display this) along with a suitably strong encryption password.
Typically, you will have a set of one Access Key, Secret Key and Encryption Password for each of your customers – make sure you keep a safely stored record of these for each customer. It’s worth noting that it’s very easy to create new access key pairs for a user via the Wasabi interface but don’t forget that you’ll also need to update the BackupAssist job if you update them.
Step 4 Configuring the Cloud Backup job in BackupAssist
A new Cloud Backup job can be created by launching the Cloud Wizard in the BackupAssist Interface at New -> Cloud Backup.
The Bucket Name you enter in the job should be unique for each backup job you create but, because of the Wasabi policy you created above, must start with the customer specific string you decided on earlier.
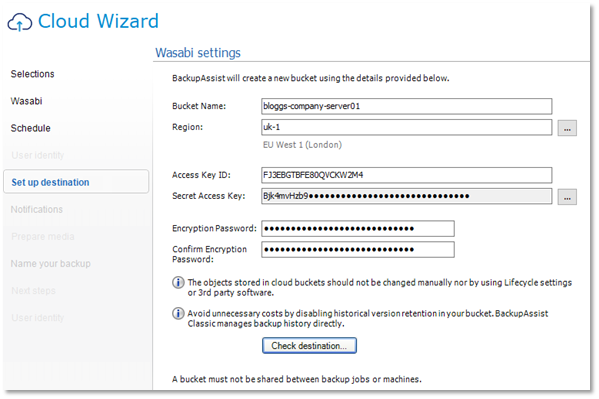
Click Check destination. to verify that the details have been entered correctly.
Once you’ve done that, if you check your Wasabi account in the Buckets section, you should see the new bucket ‘bloggs-company-server01’ has been created and that will store this backup job’s data.
Restoring Files
For restoring files from a Wasabi backup, you can use the standard restore features built into the BackupAssist console:-
RECOVER -> Files/Apps -> Local and Network files
Your backup should be listed in the backup jobs that have run recently (if your job isn’t listed or if you are trying to restore to a new PC running BackupAssist, you can use the ‘Discover Backups’ button, click the cloud button and enter your Wasabi credentials).
Then click on your job to view the contents of the bucket in Wasabi (note: if you encrypted the job, which is recommended, you’ll be asked for the encryption password at this point).
From there you can then select the files/folders to restore in the usual way.