Let’s Encrypt is a a free, automated, and open certificate authority brought to you by the non-profit Internet Security Research Group (ISRG) which allows you to create a free root trusted SSL certificate for your domain(s).
Thankfully, the MDaemon developers have taken the hard work out of registering and renewing the Let’s Encrypt SSL certificate and there are only a few simple steps needed to set one up and let it self-manage the renewals every few months.
Prerequisites
Powershell
Let’s Encrypt scripts require PowerShell V5.1 or above, so will not work on Server 2003 O/S variants.
Net Framework 4.7.2 or above is also required.
Newer versions of Windows server will have the required version of PowerShell installed already.
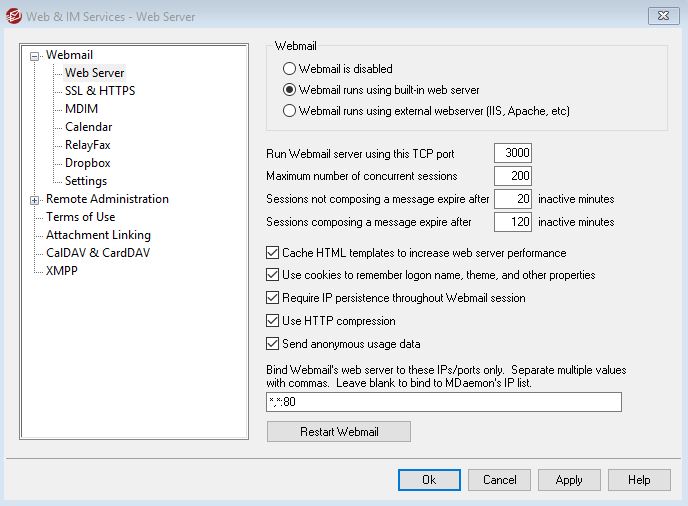
Ports and webmail binding
In order for the Let’s Encrypt registration process to validate your hostname and installation, MDaemon’s webmail web server must have port 80 traffic open to the Internet.
This means you’ll need to make sure you add the following line under the webmail bind options.
*,*:80
(this tells webmail to also respond to web traffic on port 80 on any network interface)
Enabling Let’s Encrypt
The domain that will be used by the Let’s Encrypt certificate will be the SMTP host name as defined on the default domain under Settings > Domain Manager.
If you need the certificate to be valid for additional hostnames, you can add these as alternative hosts on the next step.
Navigate to Security Settings -> SSL & TLS -> Let’s Encrypt and enable the updates.
Next enter an email address to receive any error reports.
We recommend leaving the renewal time at 60 days to allow the renewal to retry should there be any issues.
Choose OK to save the options and trigger the script to register your certificate in the background:
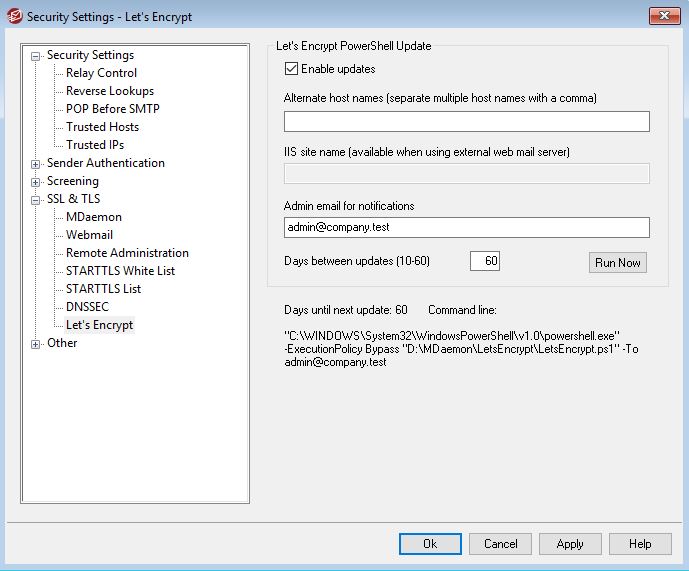
Click Run Now then OK to save the settings and if all goes well the MDaemon interface should restart shortly afterwards and a new Let’s Encrypt certificate should have been installed.
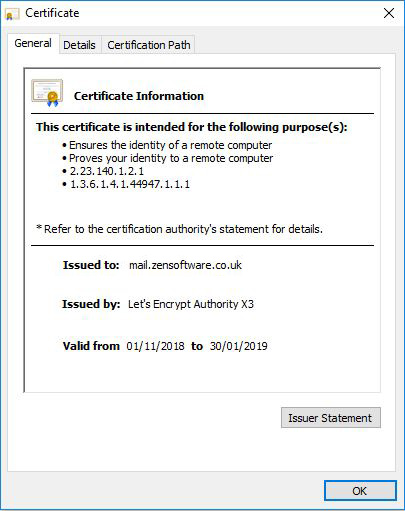
You can test if this certificate is bounded correctly by pointing a web browser to the Webmail service and view the certificate properties.
Finishing off
Make sure the new Let’s Encrypt certificate is selected for the services you’d like to be using it (the process above should have already done this).
You can check this under Security -> Security Settings -> SSL &TLS -> MDaemon and Security -> Security Settings -> SSL &TLS -> MDaemon -> Webmail.
If you have any old self-signed certificates here, this is a good time to remove them to avoid confusion.
Last but not least, redirect the standard HTTP Web traffic on port 80 to the HTTPS port 443.
This will still allow the Let’s Encrypt renewal process to work. Let’s Encrypt will still connect on port 80 but it will work via a redirect (it’s not good practise to allow unencrypted connections and this would resolve that situation).
To do this navigate to Setup -> Webmail -> SSL & HTTPS and choose the option HTTP redirected to HTTPS from the list of accepted connection types.
You now have all the benefits of a root trusted certificate but at no additional cost!


