22 Apr How to pre-check email before it’s sent (Editor approval)
 One of the particularly nice features in MDaemon is the ability to customise the flow of email through the use of its built in content filters.
In the past we’ve mainly focused on using the content filter in different ways to automate tasks, change message content and redirect mail to other locations.
In this article I’ll give you an overview of how you can make use of the content filter and MDaemon’s custom queues to intercept some or all outbound email, have a user check and authorise it manually, and then let it continue along its intended delivery path.
When is this useful?
There are a number of ways in which this feature can be used. Imagine a new member of staff joins a call centre team. It might be that you’d find it useful to vet their public facing email for accuracy while they adapt into the role. Another, more covert use, would be if you suspected a member of staff of sharing sensitive information. This would make it possible to eavesdrop on those messages and censor what’s being sent. In both cases the original sender is unaware of the action, and the person doing the checking can simply drag messages between two folders in their own email client, edit them where appropriate and then let it continue on to the recipient.
Configuring MDaemon
Lets assume we want to intercept all outbound email coming from an email address of fred@company.mail. User bill@company.mail needs to first check it before it is allowed to be send to the outside world. The user ‘Joe’ needs a simple way to see all of this outbound email as it’s sent and an easy way to accept or reject it. Ideally all within their email client (outlook).
Step 1 – Set up folders in Fred’s Outlook
Using Outlook Fred creates two sub-folders under his inbox the first called ‘To check’ and the second called ‘To send’
Step 2 – Create a custom mail queue
In MDaemon under Queues -> Mail Queues -> Custom Queues create a new ‘remote mail’ queue which points to the ‘To send’ folder on the MDaemon server’s hard drive as shown here:-
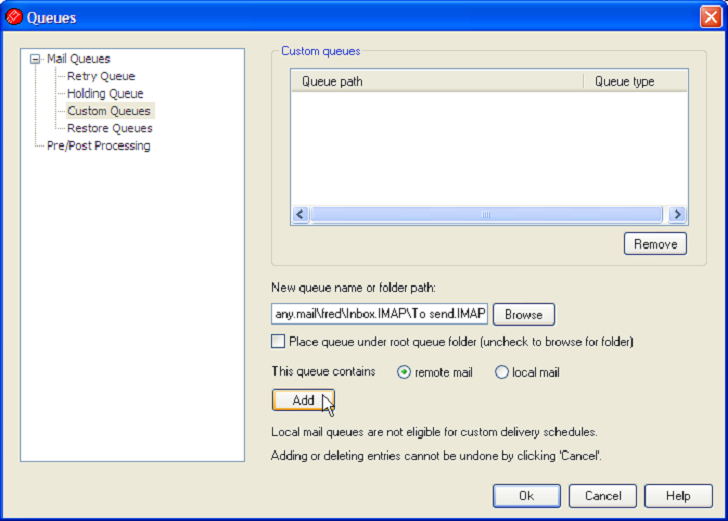
Click the ‘Add’ button to create the new custom queue and then click ‘Ok’
Step 3 – Create a Content filter to capture Bills outbound email
Under Security -> Content Filter, create a new rule that will move all of Bill’s outbound email into Fred’s ‘To check’ sub-folder as shown below:- 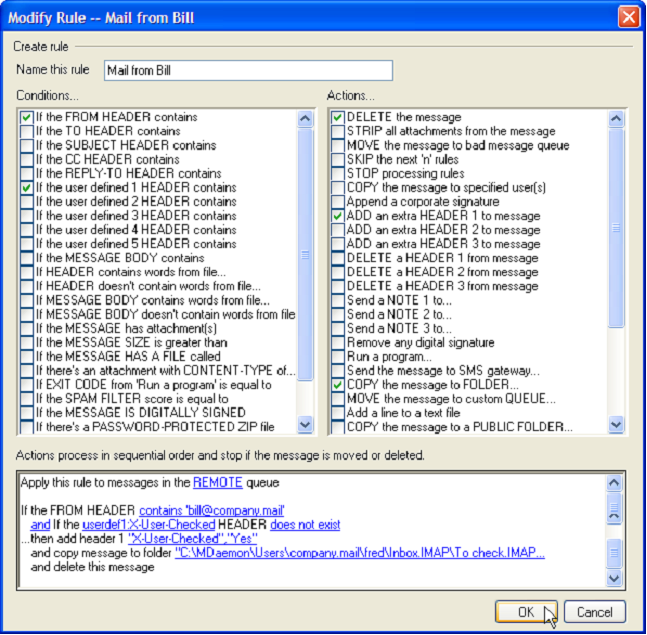
Step 4 – Manage renaming of files using a bath file
Create a new batch file called ‘precheck.bat’ in your C:\MDaemon\App folder and put the following command in the batch file:-
ren “C:\MDaemon\Users\company.mail\fred\Inbox.IMAP\To send.IMAP\md*.msg” pd*.msg
The batch file is required because emails that have been processed by MDaemon change the beginning of their file name from ‘md’ to ‘pd’ if we did not change these back they would not be visible in a user folder.
Step 5 – Run the batch file before processing emails
In MDaemon, under Queues -> Mail Queues -> Pre-Post Processing set-up the Remote queue section as shown below:- 
That’s it! All emails that Bill sends to the outside world will now end up in Fred’s ‘To check’ sub-folder. Once Fred is happy that the emails can be released, Fred simply has to drag the message into the ‘To send’ folder.
Related articles
- New video: Introduction to MDaemon webinar recording (zensoftware.co.uk)